
It does not matter whether you work in architecture, civil engineering, structural, MEP, or any other drafting discipline — if you use AutoCAD, you have almost certainly had this moment. You need to draw a set of parallel lines: a wall assembly, a pipe run with offset limits, a road cross-section, a duct with insulation, a beam with flanges. You think — MLINE was designed for exactly this. You open the command, spend ten minutes fighting with the multiline style, draw the lines, and then immediately hit a wall the moment you need to edit anything.
MLINE is one of those AutoCAD commands that sounds like the right tool and consistently lets you down in practice. This post explains exactly why — and what to use instead.
What Is MLINE and What Was It Designed For?
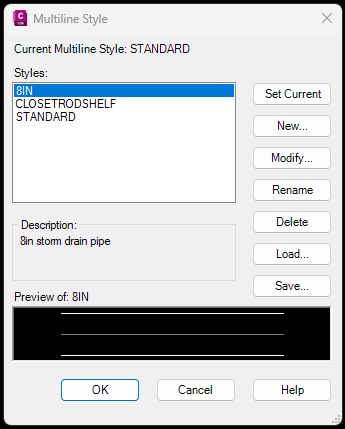
MLINE — short for Multiline — is a native AutoCAD command that draws multiple parallel lines simultaneously. You define a multiline style specifying the number of lines, their offsets from center, and individual colors and linetypes. On paper, this is exactly what a drafter needs for any multi-component linear element.
In reality, MLINE has barely evolved since it was introduced to AutoCAD in the 1990s. It is built on a fundamentally different object type from the rest of AutoCAD, and that difference creates friction at every stage of a real drafting workflow — regardless of your discipline.
The Real Problems With AutoCAD MLINE
1. You Cannot Edit Individual Components
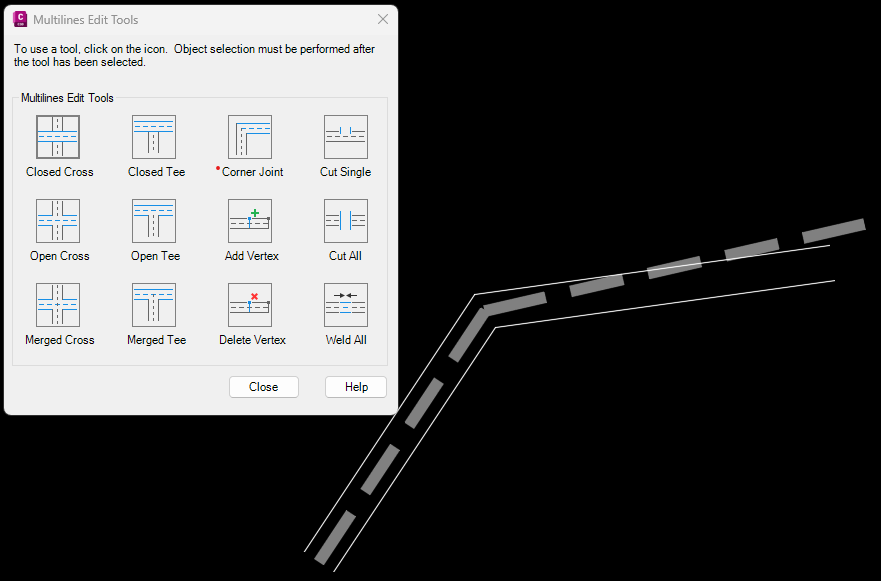
This is the single biggest limitation. An MLINE object is locked — all lines move together as one rigid unit. You cannot grip-edit, trim, extend, or offset a single component without affecting the whole multiline. AutoCAD even ships a separate command — MLEDIT — specifically because standard editing tools like TRIM do not work reliably on multilines.
This is a daily problem across every discipline. Walls have openings. Ducts branch. Pipes change direction. Roads taper. The moment your geometry gets slightly complex, MLINE becomes a liability instead of a shortcut.
2. No Lineweight Per Component
MLINE allows individual colors and linetypes per component, but lineweight is not supported at the component level. For any drawing where lineweight communicates hierarchy — a wall face heavier than the cavity line, a pipe centerline heavier than the wall lines, a beam flange heavier than the web — MLINE cannot do it. You end up faking it with color-based plotting, which is a workaround, not a solution.
3. Multiline Styles Are a Team Management Problem
MLINE styles are stored in .mln files that must be manually loaded into every drawing before the style is available. If a colleague opens your file without the matching .mln loaded, the style is missing. Distributing and maintaining these files across a team on a multi-sheet project is a coordination overhead that no drafter should have to deal with. Most firms eventually give up and stop using MLINE entirely because of this alone.
4. Significant Edits Usually Mean Redrawing
Because individual components cannot be edited independently and MLEDIT options are limited, any meaningful geometry change often means deleting the multiline and starting over. On a drawing with dozens of multiline elements, this is a substantial time cost that compounds across a project.
5. EXPLODE Is a Dead End
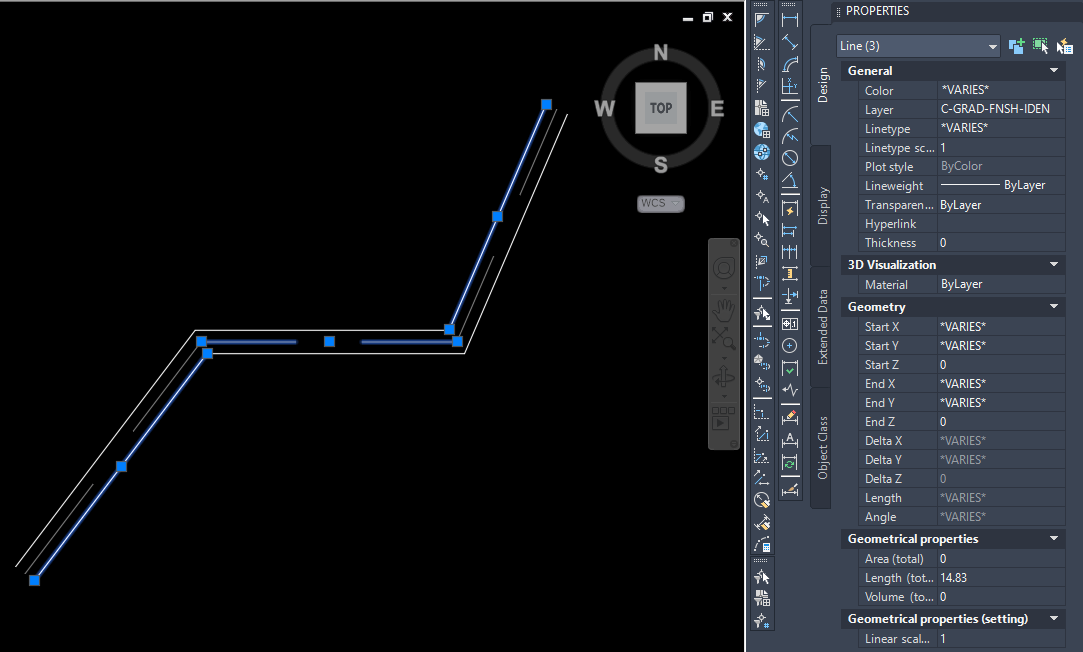
The most common workaround is to EXPLODE the MLINE into individual lines. This gives you editable geometry, but permanently destroys the multiline relationship. Now you have disconnected lines with no link between them and no way to edit them as a group. You have traded one problem for a worse one.
What Experienced Drafters Do Instead
Most experienced AutoCAD users eventually abandon MLINE and develop their own workarounds. The most common ones:
- Manual OFFSET: draw one line, offset it, assign properties to each line separately. Simple but every edit repeats across all components with no link between them.
- COPY and move: draw one polyline, copy it, move each copy to the correct offset manually. Fast to set up, painful to maintain.
- Blocks: works for fixed repetitive cross-sections but falls apart on curves, tapers, and any geometry that varies along its length.
- Discipline-specific tools: Civil 3D corridors, Revit walls, or similar — powerful but require expensive licenses and significant setup for what is often a simple drafting task.
Every workaround shares the same core problem: once the lines are drawn, there is no link between them. Edit the centerline and you are manually adjusting every parallel component by hand.
A Better Way to Draw Parallel Polylines in AutoCAD
What drafters across every discipline actually need is simple: one command that draws a configurable set of parallel lines — each one a real, independently editable POLYLINE — and keeps them linked to the master so edits propagate automatically. Not a locked MLINE. Not a corridor or a wall object. Just intelligent parallel polylines that behave like normal AutoCAD geometry.
That is what MultiPLine does. It is a free AutoLISP tool for AutoCAD 2025 (with an optional Pro upgrade) built around one command: MPL. Run it, draw a polyline exactly like you would with PLINE, press Enter — and the configured set of parallel satellite lines is generated automatically around it.
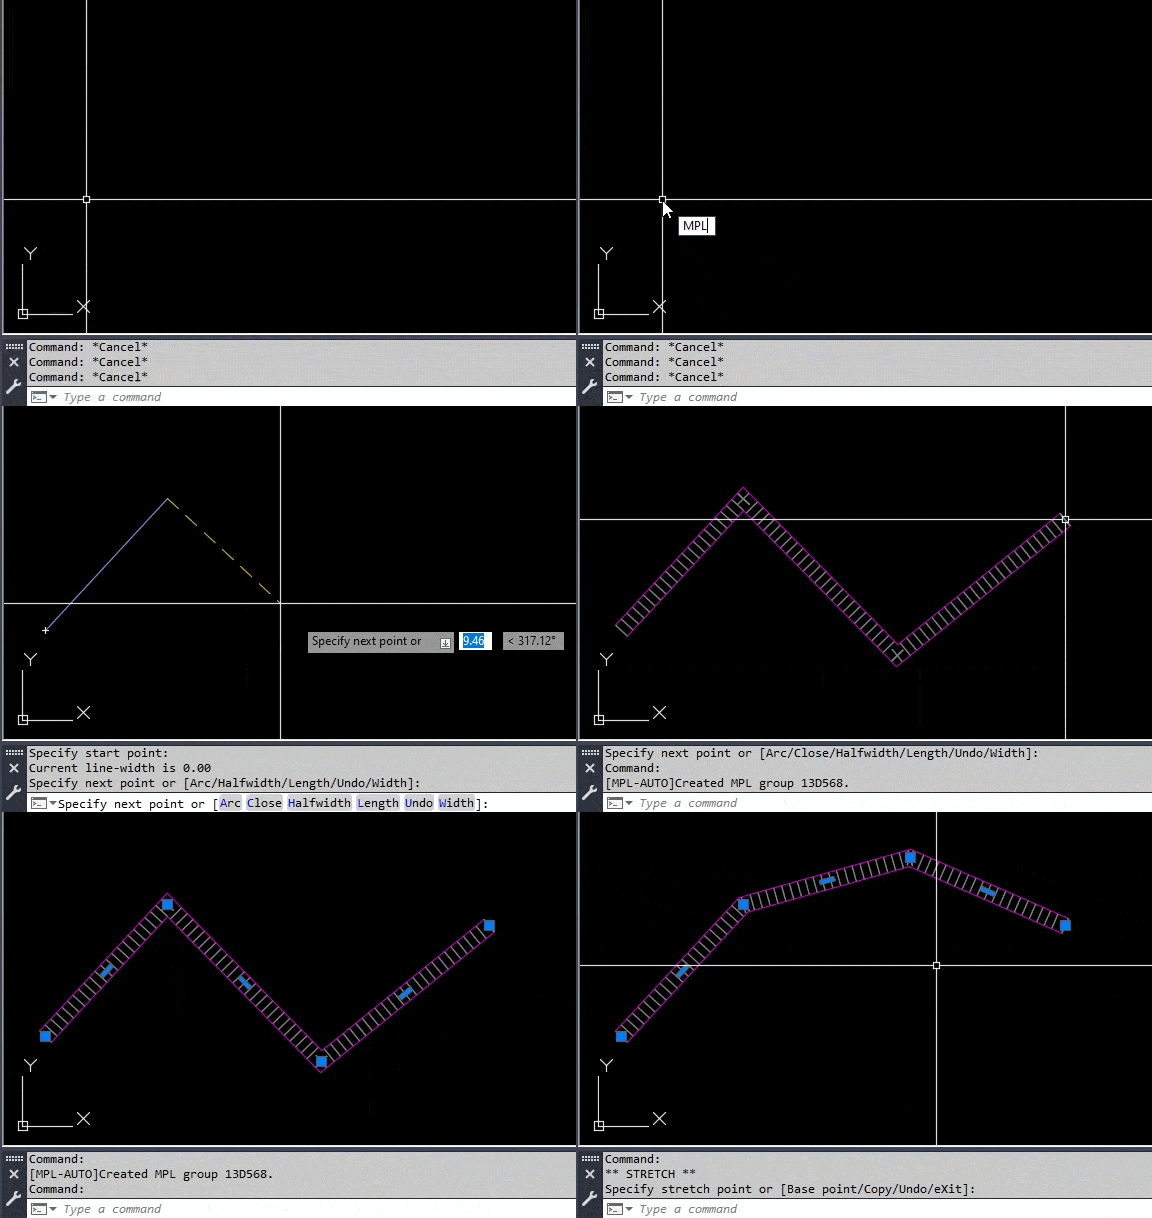
Every line MultiPLine produces is a standard LWPOLYLINE — no special object type, no locked geometry. That means full grip-edit, TRIM, EXTEND, OFFSET, JOIN, and PROPERTIES support exactly as you would expect from any polyline. And each satellite line carries its own:
- Offset distance from the master (left or right)
- Color, linetype, lineweight, and linetype scale
- Layer assignment — Pro version
- Completely automatic updates - Pro version
Who Uses MultiPLine — Use Cases Across Disciplines
Architecture — Wall Assemblies and Building Sections
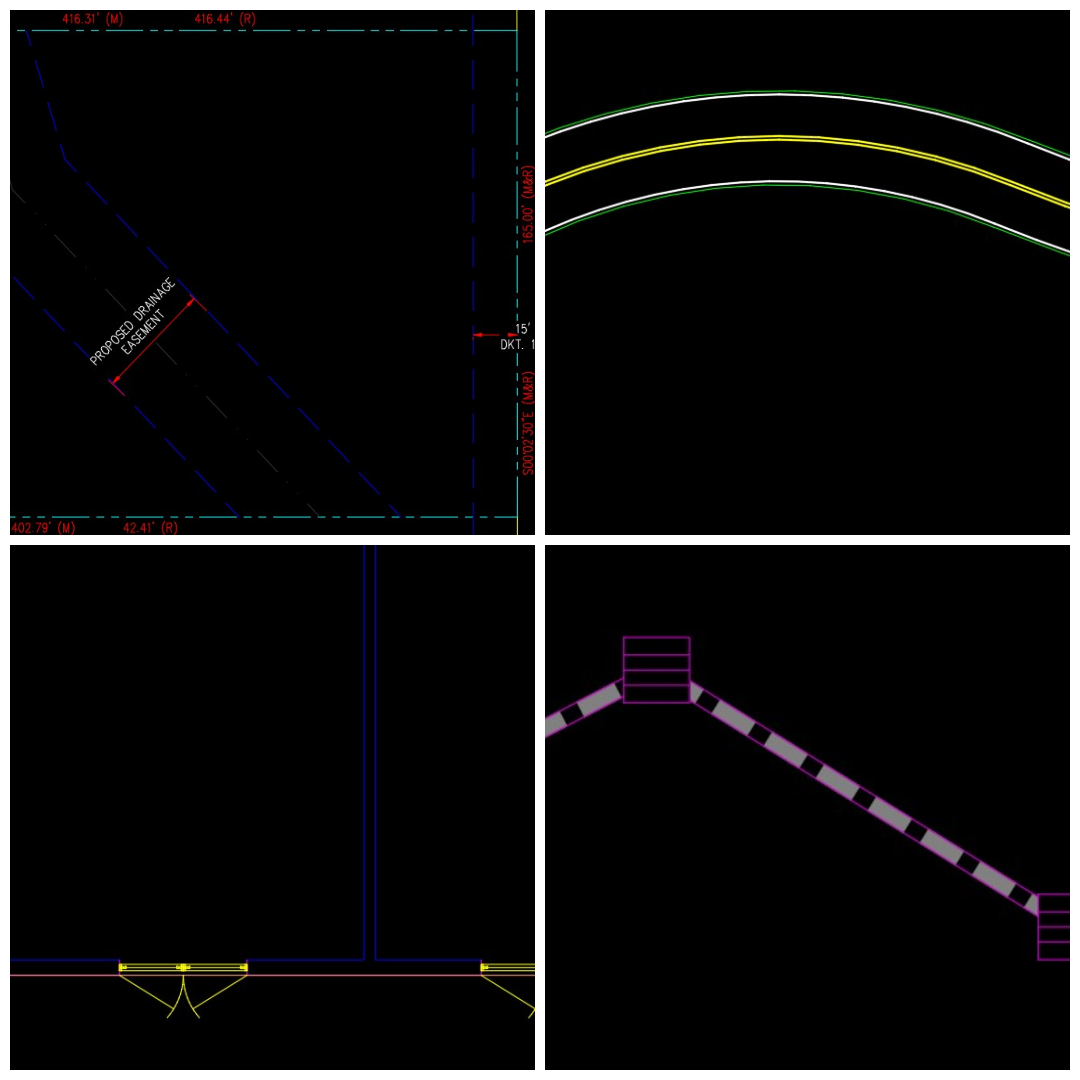
Draw a wall centerline as the master. Configure satellite lines for the finish face, structural face, and cavity gap — each on its own layer, with its own lineweight. Edit the wall run once, sync, and the assembly follows. Works for simple walls, cavity walls, and curtain wall grid lines.
MEP — Duct Runs and Pipe With Insulation
Duct centerline as master, duct walls as satellites, insulation offset as an outer satellite on a separate layer. One MPL call gives you the full duct assembly. Change the routing, sync, done. The same approach works for insulated pipe runs and cable tray with clearance bands.
Structural — Beam and Column Sections in Plan
Wide flange beam in plan: centerline on the structural layer, flange edges as satellites with a heavier lineweight, web line thinner. Save it as a preset and reuse it for every beam on the drawing.
Civil and Site — Roads, Pipes, and Easements
Road centerline with edge-of-pavement and right-of-way offsets in one command. Storm drain centerline with pipe wall offsets on a HIDDEN linetype. Easement spine with buffer bands on each side. One preset per standard cross-section, reusable across every drawing.
Surveying and Land Development — Boundary Offsets
Boundary line as master, building setback offset and easement buffer as satellites. All three lines linked — edit the boundary, sync, and the setback and buffer follow automatically.
Free Lite vs Pro — What Is the Difference?
MultiPLine Lite is completely free. It includes the full drawing engine (MPL), the settings dialog (MPLEDIT), and manual sync (MPLSYNC). After you grip-edit or move the master, run MPLSYNC, window-select the group, and the satellites rebuild. For most individual drafters this is all they need.
MultiPLine Pro ($29.49, one-time purchase) adds three things that turn the tool into a daily driver:
- Auto-sync: a command reactor watches your master polylines. Grip-edit, stretch, move, or rotate — the satellites rebuild automatically without any MPLSYNC call.
- Named preset library: save your current configuration as a named preset — “Exterior Wall”, “Insulated Duct 600mm”, “Road Centerline” — and load it from a dropdown in any drawing on any machine.
- Per-satellite layer control: assign each satellite line to its own layer directly from the dialog. Load a preset and the entire layer structure wires up automatically.
MultiPLine Lite is free with no time limit and no nag screen. Try it on a real drawing before deciding whether Pro fits your workflow.
How to Get MultiPLine
MultiPLine Lite (Free): https://skillamplifier.gumroad.com/l/hgpujs
MultiPLine Pro ($29.49): https://skillamplifier.gumroad.com/l/nsidsv
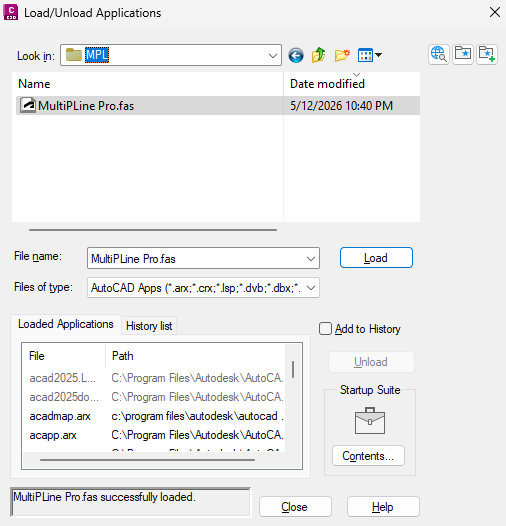
Installation is straightforward — drop the file in a folder, run APPLOAD in AutoCAD, browse to the file, click Load. Add it to the Startup Suite in APPLOAD so it loads automatically with every drawing. Full documentation and a video walkthrough are available on the SkillAmplifier blog: https://skillamplifier.wordpress.com/2026/05/16/multipline/
The Bottom Line
MLINE was a reasonable idea that never received the development it needed. Its limitations are not obscure edge cases — they are fundamental problems that surface in normal everyday drafting work, across every discipline that uses AutoCAD.
Drawing parallel lines in AutoCAD does not need to be this hard. One command, configurable parallel polylines, real editable geometry, no locked objects, no .mln files to manage. That is the workflow MultiPLine gives you — and the free Lite version is a one-minute install away.
Questions, feedback, or a use case I have not covered? Leave a comment below or find more AutoCAD tools and tutorials at SkillAmplifier.
Try it on your own drawing
TerraDraft Lite is free to download.